There are so many quilts I have made that I wish I had written a
tutorial on the process as I soon forget how I arrived at my measurements. But I
am always lazy about taking pictures as I work and often start with good intentions
that are forgotten down the road. And so those tutes never get written. And yet
I am always so grateful for all those well written tutorials that spare me
doing complicated math and are well illustrated too. This time when I drafted a
simple board game and then a second one to go on the back I thought it was time
to show some caring. A sort of thank you to all those who share freely. I
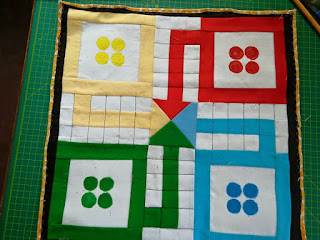
managed to take pictures of almost all the steps too. Yes almost! Some did get missed out so you may have to guess a little. Here is the finished board - this side
And that side.
And that side.
Snakes and Ladders tute
Fabric in two colours preferably solids as it gets too busy otherwise.
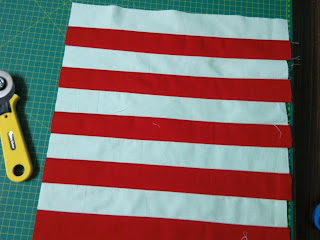
10 strips of 2.5” x 20” in each colour.
Strip sew them alternating the colors and keeping a seam of ¼”.
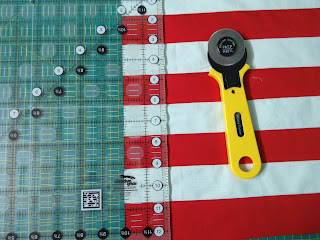
Cut them across at 2.5" intervals.
Arrange the strips so that it looks like a chess board and sew again with ¼ seam allowance.
.
Press with hot iron to make it lie flat. Add a light interfacing to give the patchwork some stability. That is the basic board. Now for the embellishments
I googled the game and used an online image to decide where the ladders and snakes would go but I am told there is no hard and fast rule. Just make sure you distribute them evenly over the board and use the same number of ladders and snakes. For the ladders I marked them first and then used narrow satin stitch to do the sides of the ladder and straight stitches for the rungs. I did sew the rungs twice as I had to travel back and it looked better that way.
The snakes were a little more of a challenge as I decided to
use HeatnBond Lite for the applique. Now I think that needle turn would be a
better idea as long as you cut the fabric on bias. If you are fusing you will
need to draft the board on paper, draw the snakes, cut them out and trace them
after reversing on your preferred brand of fusible paper. Bond it with fabric
and lay it in the right place and press. Then sew over it. Add your
embellishments like a red tongue and beady eyes. I did use beads. I also
painted the snakes for the heck of it. And then go back to kindergarten and sew
the numbers or write or paint them. Make sure the path of the numbers is
correct though. I used the font in my machine. Do the numbers at the end as often
the snakes may end up hiding them otherwise.
And that is your Snakes and Ladder! And now for the Ludo
board!
Ludo board tute
You can do this with scraps so I am not giving any fabric
requirements. You need a neutral colour and the four colors that make up a ludo
board. You could of course change them around if you feel like. I have gone
with red, green, blue and of course yellow and used white as the neutral. Since
I was backing the Snake and Ladder with this board, I made sure the
measurements were the same.
Cut 4 nos of 4.5” squares in white and 4 strips each in the four
colors of 1.5 width. The strip length can be wof as you can trim and use it as
needed. Like a log cabin or courthouse block sew the strips around the white
square. You will do this for each of the four colourṣ
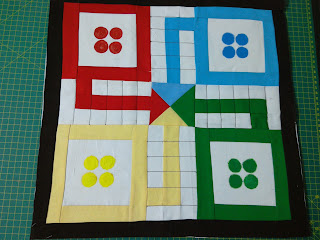
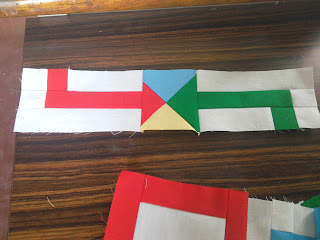
The next step is a touch less simple. If you see the picture
you will see that the first step out is in the color of the square you start
out with. And the centre path is again in colour. The finished size of the
pathway is 5x3. So for every color cut 1 strip in white measuring 5.5” into 1.5”.
One in the color (red, green etc) measuring 4.5” x 1.5”. Add a piece of white
measuring 1.5 into 1.5 at the bottom end. The third strip is a white one with
the color as a step not quite at the bottom. Cut a white strip 4.5” in white,
trim off a piece that measure 1.5” inches from this and add a piece in matching colour
measuring again 1.5 x 1.5. Now sew back the white. Sew all three strips
together.
For the centre which is made of all the colours, cut 5" squares in each colour. Lay any two colours, right side facing and sew up to make a half square triangle as described here. Do the same with the other set of colours. Take one each of the resulting HST and again following the same method sew up to get a QST in 4 different colourṣ. I missed taking pictures at this stage. Trim carefully to get a square measuring 3.5". You can see that I trimmed too much on one side and too less on the other. Make sure the diagonals meet at the corners.
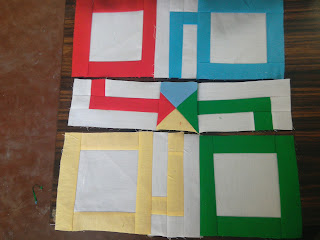
Layout the board and double check to make sure your colors are all in the correct place. Sew up like you would any patchwork.
Now mark every 1 inch in the pathway and sew in black to mark the squares. Also in the centre of the squares mark the spot where one would keep the counters. I painted the circles but you could simply applique it You should have something that looks like the picture below.
.
I added stiff interfacing so the board would not flop and also added a 1 inch border. I placed the two boards wrong sides together and finished off with binding. You can also sew the two boards together after placing them wrong sides together. Leave a gap and turn it inside out. Sew up the gap and also topstitch.
You could personalise it with the name of the kiḍ I opted not to do iṭ




These are lovely. Thanks for sharing!
ReplyDeleteThese are lovely. Thanks for sharing!
ReplyDelete